Dandelion Language

I like DANDELIONS. 🤍 As a matter of fact, I like them so much that my children have all been raised in such a way that when they see them, they call them “WISHING FLOWERS.”
We blow on the puffball plume of seeds while making a wish and say that each seed able to root increases the chance of our wish blooming into existence.
#perspective #WhatAmberLoves
(card from Urban Crow Oracle deck)


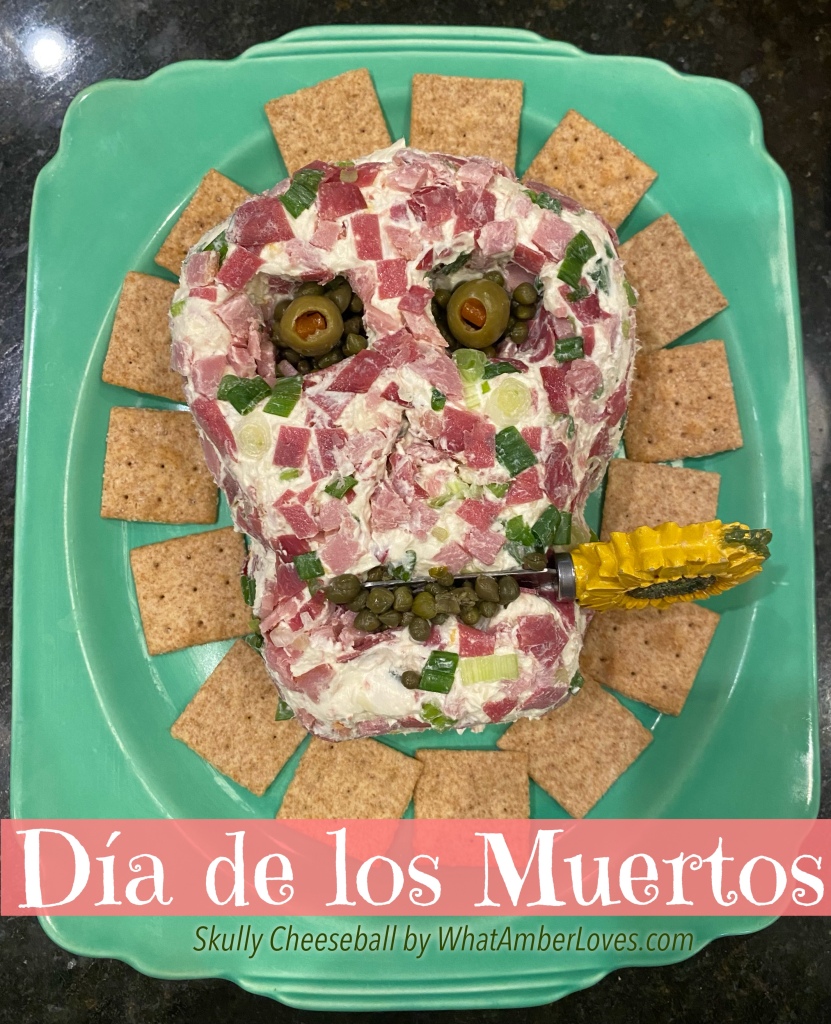
Día de los Muertos ~ Skull Cheeseball
Well, it turns out I’m not at all done “playing with my food” just because the weekend is over. I had a few spare minutes after lunch, so I put together a #DíaDeLosMuertos #CheeseBall for my husband & daughters to have as an afternoon snack when they get home later.
🌹cream cheese – 2 blocks, 8 ounce ea
🌹green onions – about 6, sliced thinly
🌹dried beef – 2.25 oz jar, finely chopped
🌹smoked ham – 4 oz finely chopped
🌹finely shredded cheddar
🌹garlic powder
🌹accent – sprinkled on green onions
🌹Worcestershire – 2 teaspoons
🫒embellished with 2 olives and some capers just for decoration

🌻💀🌻
Your Friend, AmberHH

Bloody Eyeballs!
We’re bringing #EYEBALLS to the Halloween party tonight!
👁 Easy to assemble & healthy-ish
👁 Fresh blueberries
👁 Canned #lychee fruit
👁 Strawberry Jam
👁 Toothpicks


These are sweet, fun, and a bit gory in appearance. The recipe/assemblage is simple. The finished treats amuse me a lot.
Do you think other guests at the party we’re attending tonight will be willing to try one?
🎃🩸👁🩸
Your Friend,
AmberHH

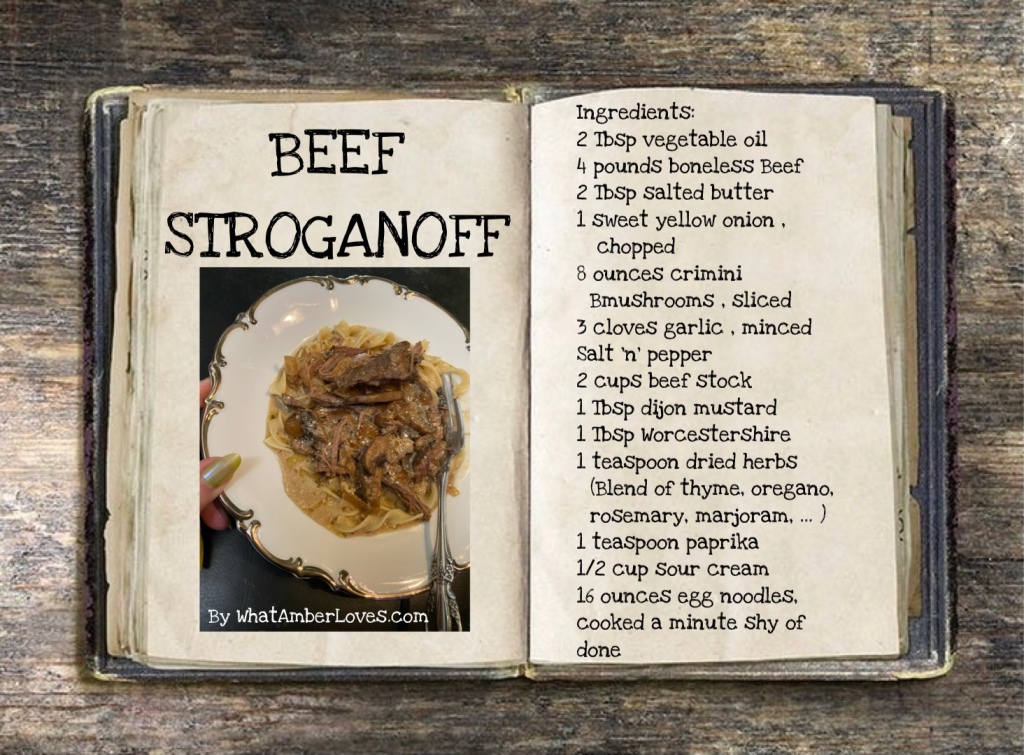
Favorite Beef Stroganoff
First, I’m going to give the recipe so you can easily jump to top of page for ingredients and instructions and then add helpful photos. TIP: Rather than putting raw ingredients into the slow cooker, I highly suggest following first two steps thoroughly for best flavor.
Ingredients
• 1 Tbsp vegetable oil
• 4 pounds boneless beef
• 1 teaspoon salt
• 1 sweet yellow onion , thinly sliced
• 8 ounces crimini mushrooms , sliced
• 3 cloves garlic, finely chopped
• 2 cups beef stock
• 1 Tbsp spicy brown mustard
• 1 Tbsp Worcestershire
• 1 teaspoon dried green herb blend (thyme, rosemary, oregano, marjoram, etc)
• 1 teaspoon smoked sweet paprika
• 1/2 cup sour cream
• 16 ounces egg noodles, cooked about a minute or two less than done
Instructions:
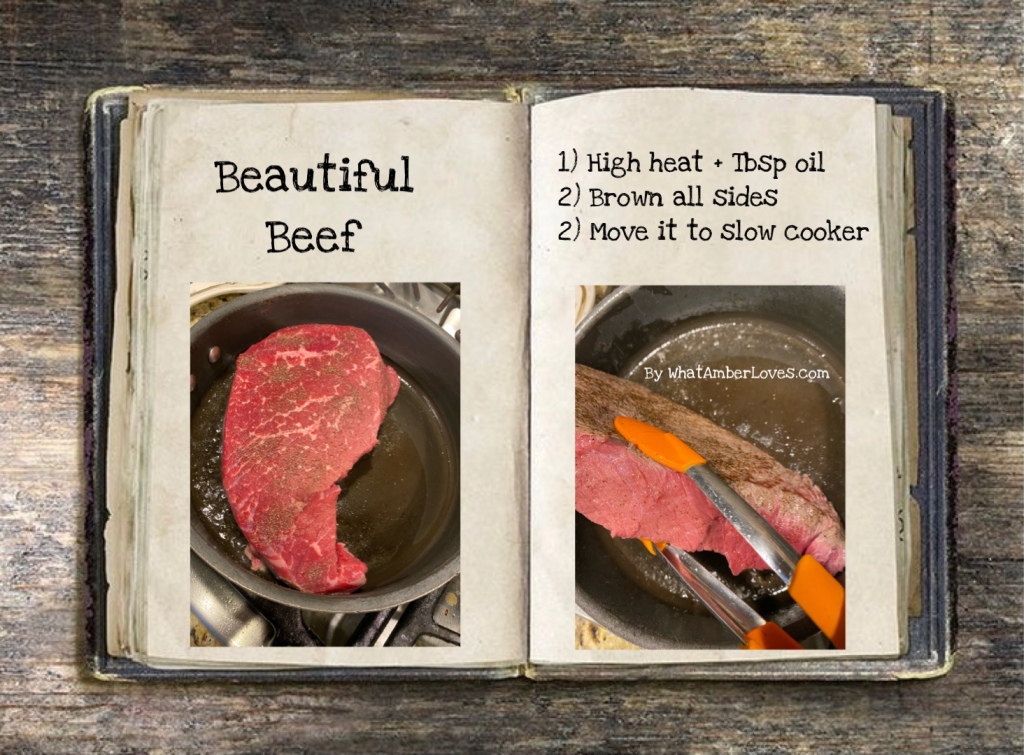
• With high heat and tablespoon of oil in skillet, brown beef on all sides. Move the beef from skillet into the crockpot pot (or Dutch oven pot, if you’ll finish the cooking process in the oven instead of slow cooker crockpot.)
• Add thinly sliced sweet yellow onion into the skillet with a tablespoon of butter and a generous sprinkle of salt. Cook on low-medium until onions become translucent and quite blond. This step can take about 30 minutes, so it is a great time to tend to another task and just stir onions occasionally.
• Once onions are ready, add a few cloves of finely chopped garlic and mushrooms to the skillet. Cook until the liquid from mushrooms has released.
• In a small bowl (I used a 4 cup glass) mix together the 2 cups beef stock, 1 Tbsp mustard, 1 Tbsp Worcestershire, herbs, paprika, & pepper. Add this mix to the skillet of onions, garlic, & mushrooms. Stir thoroughly.
• Pour this full skillet over the beef in the slow cooker crockpot.
• Set timer for 6-8 hours and walk away. (-or- Cover pot and roast in the oven for 2-3 hours, until beef is easy to shred.)
• Near end of beef cooking time, boil egg noodles according to package directions (about 7 minutes.) Drain.
• Using two forks, easily shred the tender beef into bite size pieces. Stir in the sour cream. Add your cooked noodles. Serve and Enjoy!


Well, is this a recipe you’ll try at home, too?
I’m not promoting this recipe as a “one pot meal,” like the ones where authors suggest putting a bunch of raw ingredients into the slow cooker. I truly, truly believe this dish is infinitely elevated if you take the moment to pre-brown all sides of the beef. Likewise, using that same skillet, cooking the onions over low-medium heat for an extended period of time really brings out a sweetness in the onions that you wouldn’t get if added to slow cooker raw.
Rather than standing over onions in the skillet for half an hour, I simply just tend to other tasks in the room and only stir them every 5-7 minutes. (I’ll unload the dishwasher, or catch up on email, or just anything else I can do while loosely keeping an eye on the onions.)
Let me know if you have questions! I’m also always interested in hearing about ways you make adjustments for your particular taste preferences. I hope you find this as a great base to make it your own. The meat is so tender! The sauce is so rich and flavorful.
(Using a red wine, like a Malbec, in addition to or instead of beef stock yields great results, too!)
Later Gators & Afterwhile Crocodiles! Your Friend, —AmberHH


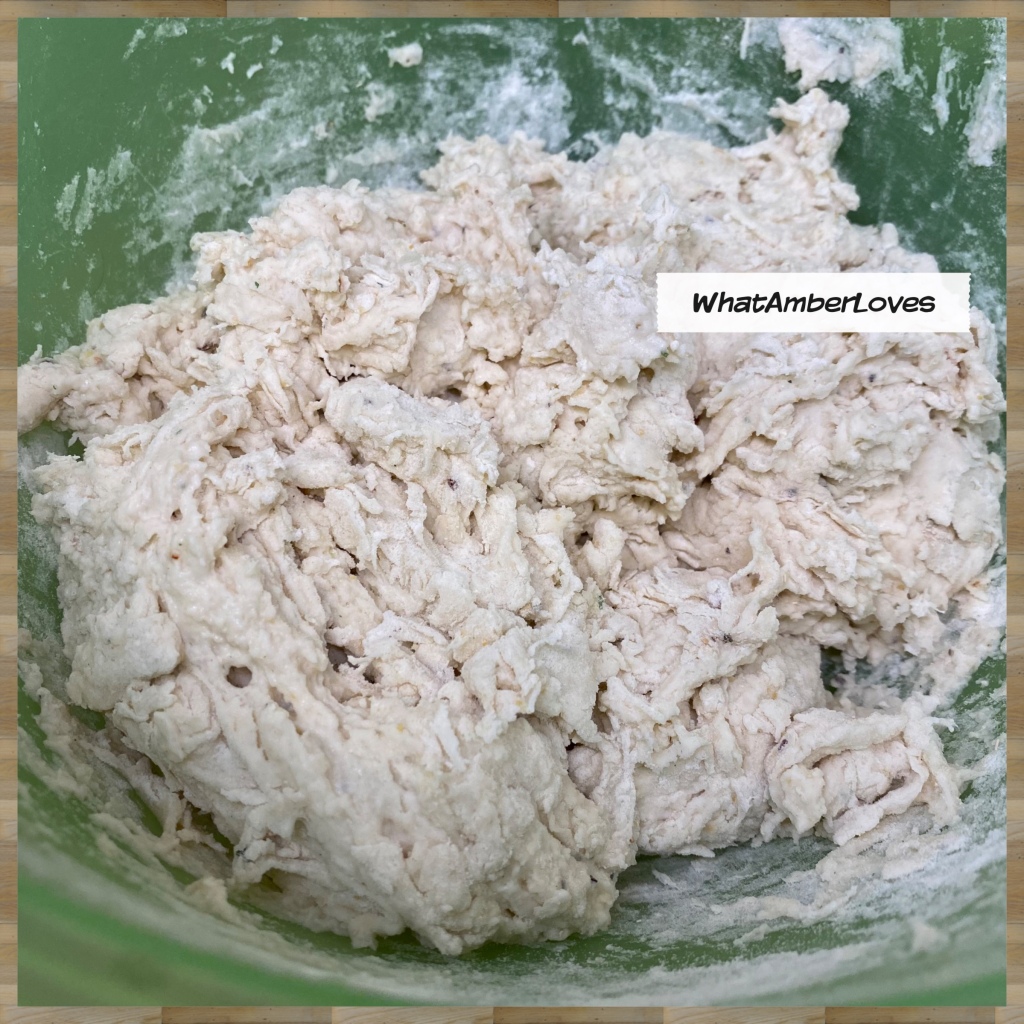
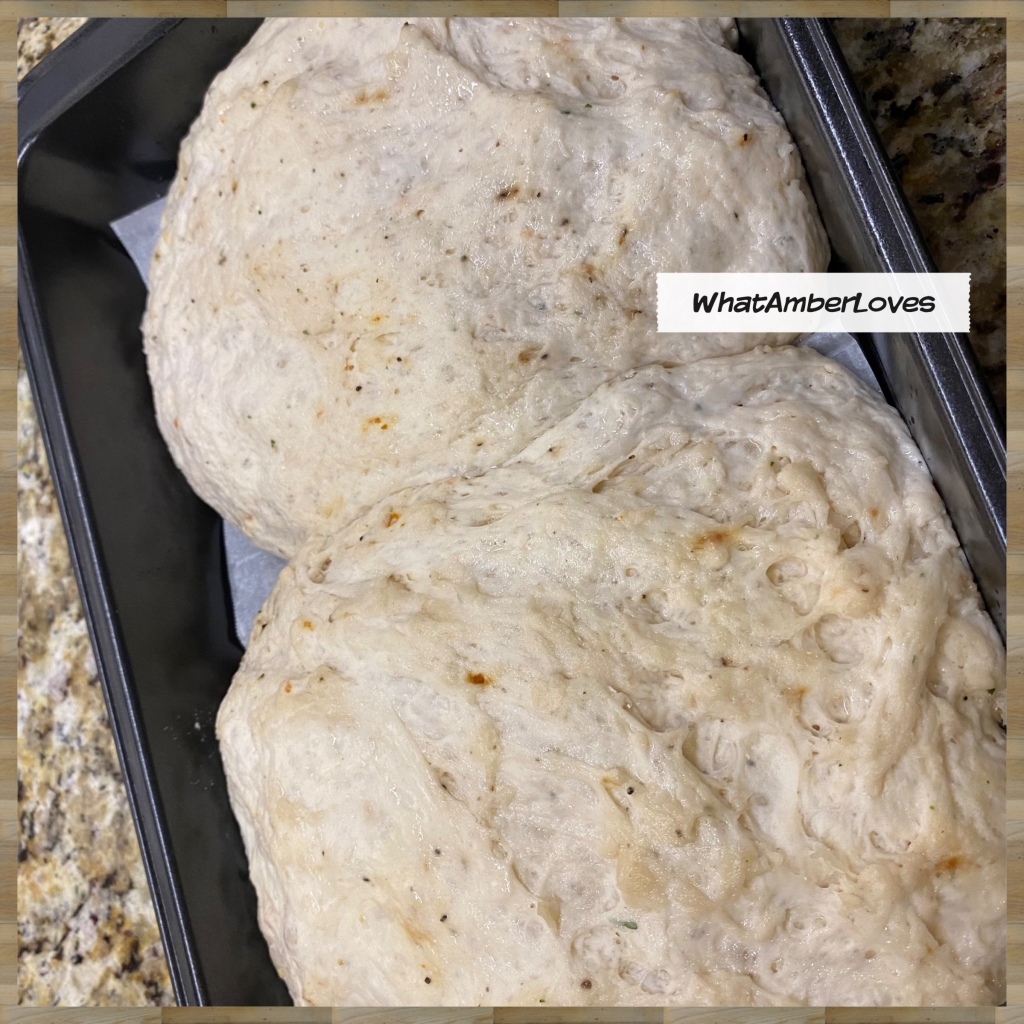
Focaccia Bread! Happy Harvest Day!
🌾🌻🌾 Lammas. 🌻🌾🌻 Give Thanks.
Harvest Day. 🌾🌻🌾 Loaf Mass. 🌻🌾🌻
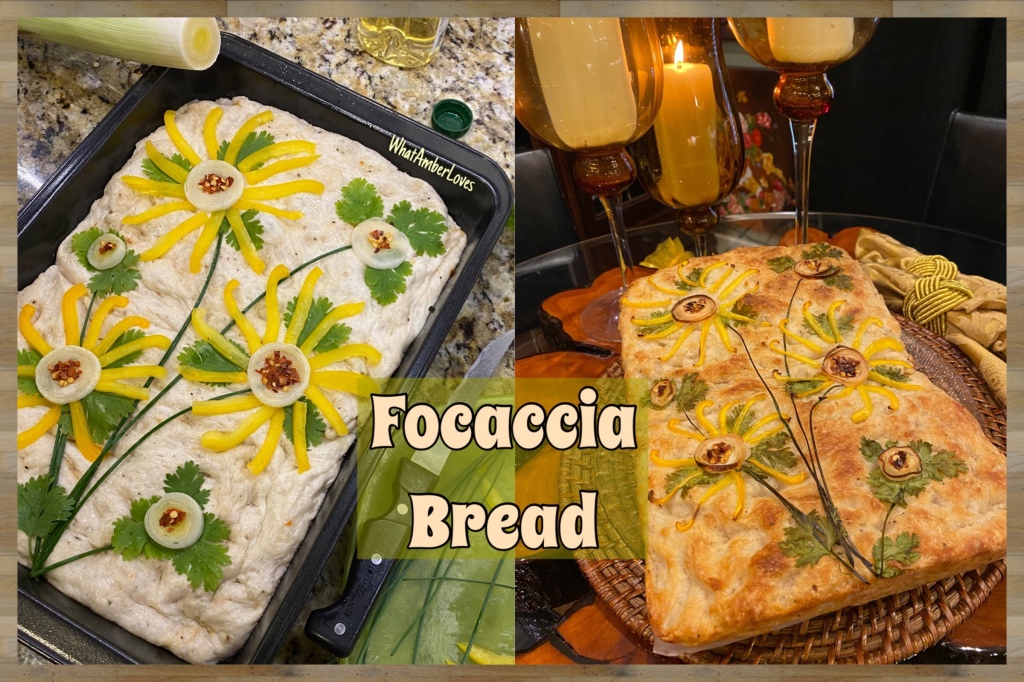
Focaccia Bread! So fun and easy to make and decorate! First, let’s look at the ingredients and instructions. Then, if you want, you’ll find lots of step by step photos to peruse to keep you on track. This is an easy recipe to follow that is pretty foolproof and flexible. While there are times of rest and time of baking, overall you’re only “hands on” for about 15 minutes in the whole process.
INGREDIENTS:
• 4 cups all-purpose flour
• 1 packet of dry Italian dressing seasoning blend
• 2¼ teaspoons instant yeast (1 packet)
• 2 cups warm tap water
• 4 tablespoons olive oil divided
*Optional toppings/decorations*
INSTRUCTIONS:
Prepare the Dough:
1. In a medium-large bowl, combine flour, packet of dry dressing seasoning, and INSTANT yeast. (This is different yeast than most commonly seen varieties of quick yeast.) Stir well. Add the warm water. Using a sturdy wooden spoon, mix until all of the flour is well incorporated (there should be no small pockets of flour.) Cover the bowl with a lid and refrigerate for at least 8 hours and up to 24 hours.
2. Line pan(s) with parchment paper. Pour one tablespoon of olive oil into the center of a metal 9”x12” pan, or smaller pans. Divide dough in half with a large spoon or rubber spatula and place dough in pan, turning to coat with oil. Tuck edges of dough underneath to form a couple of rough balls.
3. Cover each pan and allow the dough balls to rise for 2 hours (it may take as long as 3 hours, depending on the warmth of your kitchen). The dough should cover most of the pan.
Decorate & Bake:
1. Preheat oven to 425˚F with a rack positioned in the center of the oven.
2. Drizzle another tablespoon of oil over each round of dough. With oiled fingers, using only fingertips press gently stretch the dough, if needed, to allow the dough to fill the pan. Also, press a few dimples in thick areas of dough if needed.
3. Sprinkle the top with seasoning and flaky sea salt.
4. Optional: Decorate with thin slices of veg and herbs. (Really thin slices work best to avoid affecting the integrity of the bread during and after baking.) I like using all sorts of things that vary according the design I want to achieve: chives, parsley, cilantro, oregano, bell pepper, tomatoes, green onion, leek, black olives, etc
5. Transfer the pans to the preheated oven. Bake for 20 to 25 minutes, until the tops are golden and the undersides are crisp. Remove pans from the oven.
6. The parchment paper allows you to easily lift the loaves from pan. Serve warm or allow to cool completely then store in a zippered bag.
🌾🌻🌾🌻🌾


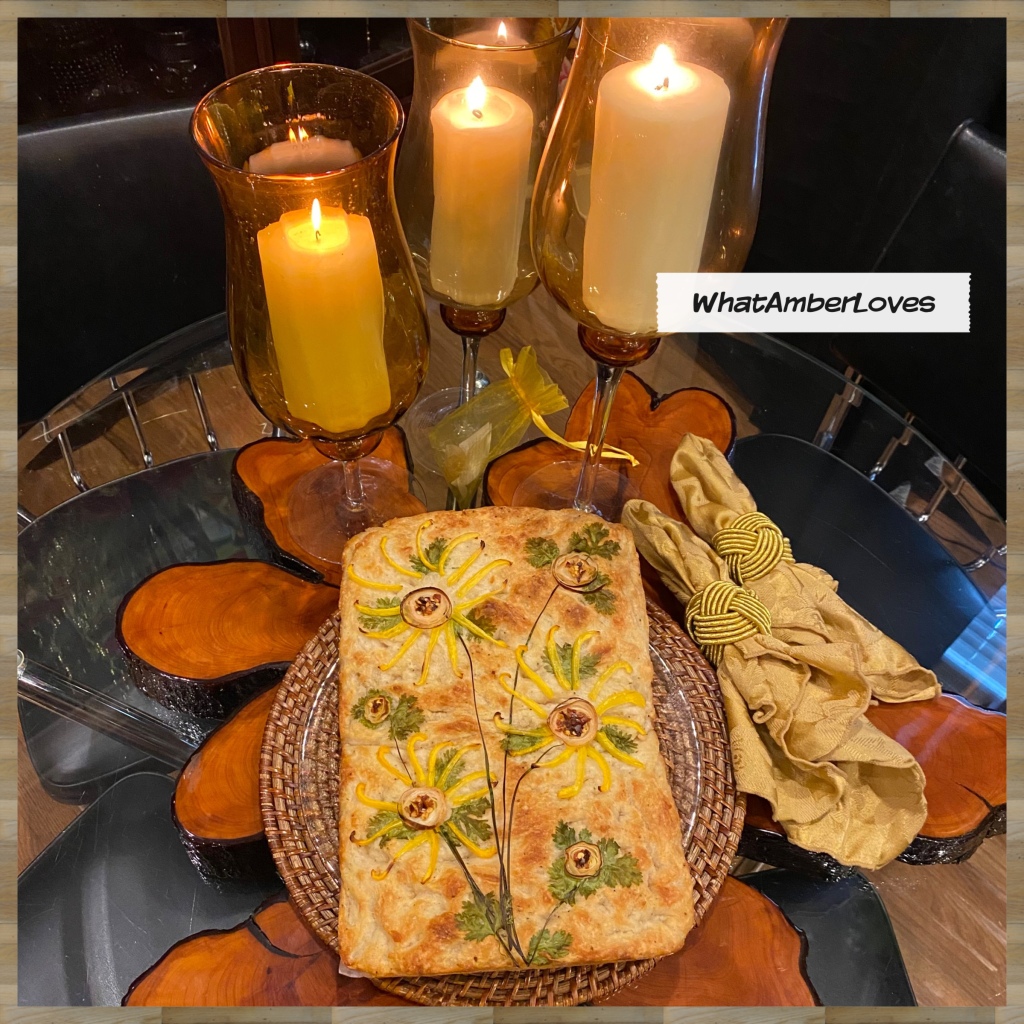
Happy Harvest Day!
This is such a fun, easy bread to make any day of the year. You can artfully decorate the focaccia bread to fit any season or holiday. Sunflowers just seemed fun to me today in acknowledgment of First Harvest Holiday commonly known as Lammas or Loaf Mass.
I am grateful for the bounty of the season!
Your Friend, —AmberHH


Mad Tea Party 2021: MyMsMellow in Wonderland
My daughters and I had two goals for participating in this year’s virtual Mad Tea Party being hosted by A Fanciful Twist. Those goals were: 1) decorating a tea box to store our teas and 2) playing as Mad Hatter dressing the newest addition to our family, our recently rescued from the living on the street dog MsMellow, in various hats and jewels.

The tea box is off to a great start!
It was originally a box intended to store silver service / flatware. It was old and musty.
—We stripped the interior,
—sanded and stained exterior,
—added new velvet lining,
—painted the inside of the lid,
—embellished with shiny heart stickers,
—added clear acrylic divider trays,
—and stocked it with teas that we had in the kitchen cabinets.
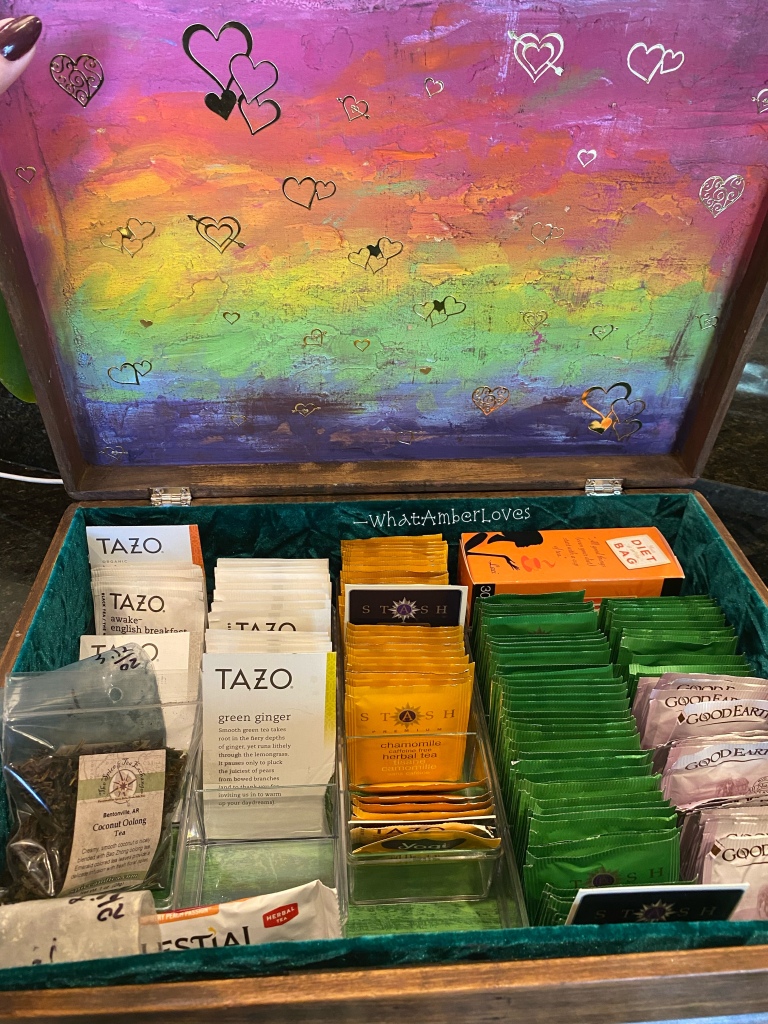
Im so pleased with it. I’ll also likely keep adding to the embellishments of it in future months. Wouldn’t a crystal knob be so perfect on it? Completing the service tray that accompanies it will be fun, too!

Next, we decided to try being the Mad Hatter and trying to dress our dog in hats…
🤣🤣🤣
While MsMellow continued to be extremely kind and all, she was actually unexpectedly a bit bonkers about the hats and became a little too excited hopping around for us to get even a single decent photo of her in the many hats she tried on.
🤣🤣🤣
Bonkers, I tell you, Bonkers!!
🤣🤣🤣
Insider Secret: … all of the best dogs are, though!
❤️❤️❤️
Here are the photos:


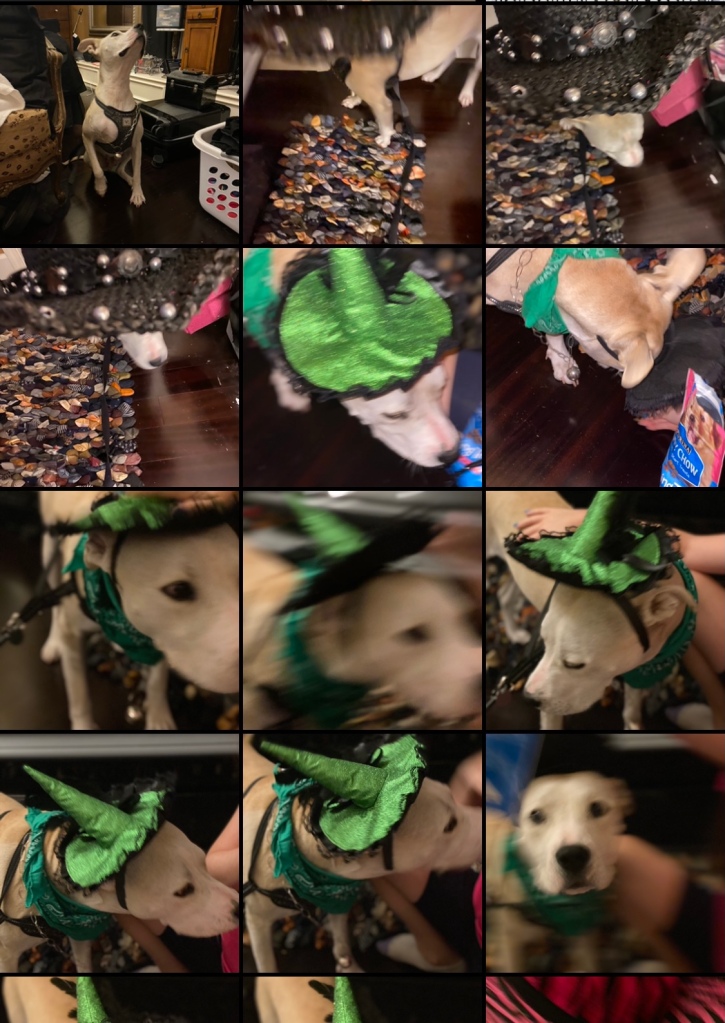
Even though we don’t have any posed glamour shot portraits of MsMellow in hats, daughters and I laughed and laughed and laughed and laughed and had so much fun with the trying. It was the BEST.
13/10 great experience as Mad Hatter. ❤️
I would absolutely do every bit of it again.
Your Friend, AmberHH
PS
—If you’re also participating in the Mad Tea hop, I’d love for you to leave a comment with your link! ❤️
—Whether you’re participating or not, you’ll want to visit our hostess at A Fanciful Twist to see her party and find links to other participants
—you can see my 3 previous mad tea parties at these three links:
https://whatamberloves.com/2016/07/23/mad-tea-party-2016-blog-hop/
https://whatamberloves.com/2015/07/10/mad-tea-party-2015/
https://whatamberloves.com/2016/07/23/mad-tea-party-2016-blog-hop/

Mad Tea Party! 🐇♥️
Once again this year, I’m so excited to announce that I’ll participate in a Wonderland themed “Mad Tea Party!” blog hop event organized and hosted by the always lovely Vanessa’s site, A Fanciful Twist!
New this year, we’ll also hop on Instagram!

For more information about how to join, what to expect, and to see links to Tea Parties hosted in previous years, you’ll need to visit https://afancifultwist.typepad.com/a_fanciful_twist/2021/07/into-wonderland-for-our-2021-mad-tea-party.html#comment-6a00d83451d99869e20282e110bc1d200b
You can see my participation in 2016, 2015, and 2014 at these links:
https://whatamberloves.com/2016/07/23/mad-tea-party-2016-blog-hop/
https://whatamberloves.com/2015/07/10/mad-tea-party-2015/
https://whatamberloves.com/2014/07/12/mad-tea-party-2014/
So exciting! Now, to prepare … !!
💚 —Amber

Looksie


Notes to self:
Be authentic.
Be strong, but not rude.
Be kind, but not weak.
Be bold, but don’t bully.
Be humble, but not shy.
Be proud, but not arrogant.
Go to sleep with a dream.
Wake up with a purpose.
#Selfie 🤳🏻

Generally good ideas:
🌿 Be present, not perfect.
🪨 Be love, be light, be peace, and definitely be a little go f*ck yourself when the situation calls for it.
🪵 Enjoy a creative mess as much as idle tidiness.

✨🌿🖤🌿✨

So many things have been happening that I might want to write posts about … so many wonderful things I’ve been documenting with photos, ready to share here soon … new dog, new recipes, renovating an old house across town from where we currently live, adventures, and more …
I’ll be back here with those photos soon!
🤍 —Amber

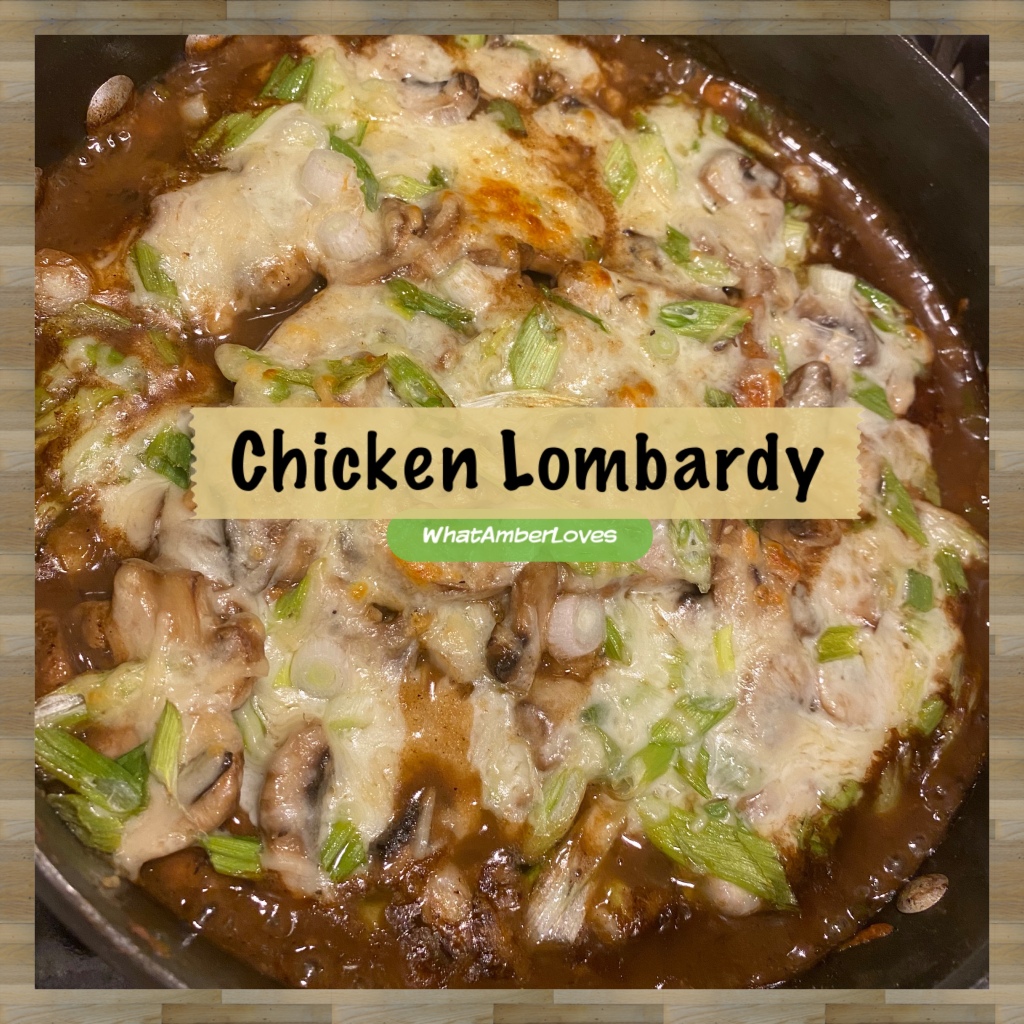
Chicken Lombardy!
This recipe. This.
Ingredients:
- 3 boneless skinless chicken breasts
- 1/3 cup butter divided
- 1 cup all purpose flour
- 8 oz sliced mushrooms
- 3/4 cup marsala wine, dry not sweet
- 1/2 cup chicken stock
- salt, pepper, garlic powder
- 1/2 cup shredded mozzarella
- 1/2 cup parmesan cheese
- 4 green onions sliced
Instructions
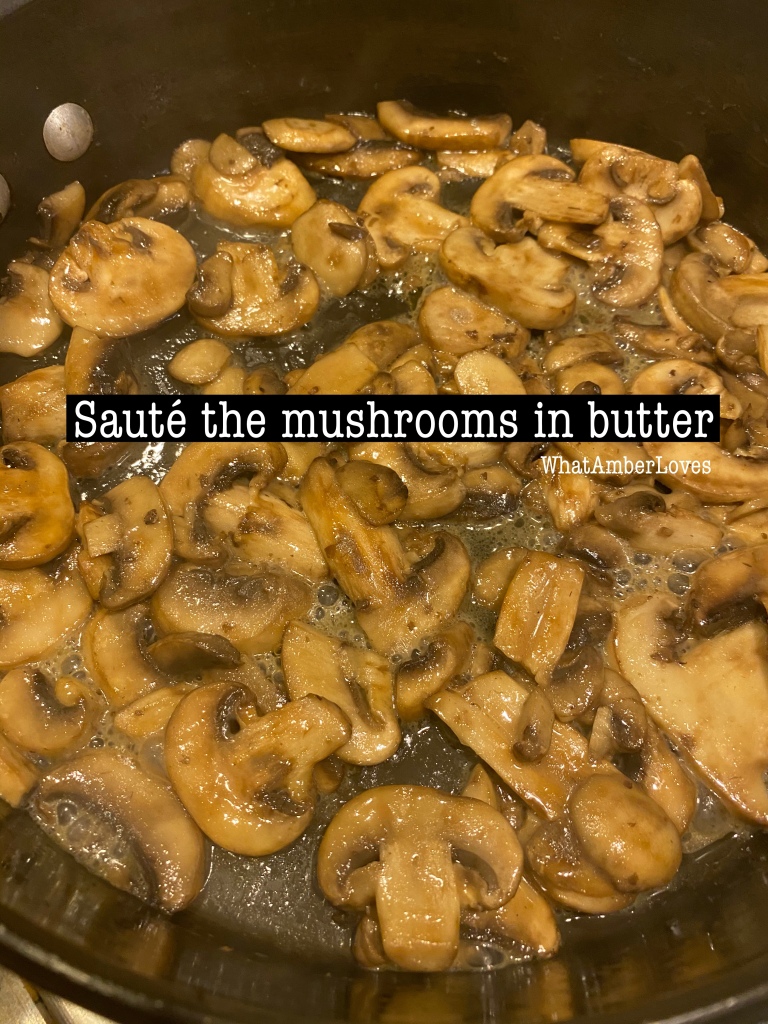
- Heat a large skillet over medium-high heat and add 2 tbs butter.
- Add the mushrooms and cook, stirring frequently, until they begin to brown; remove them and set aside.
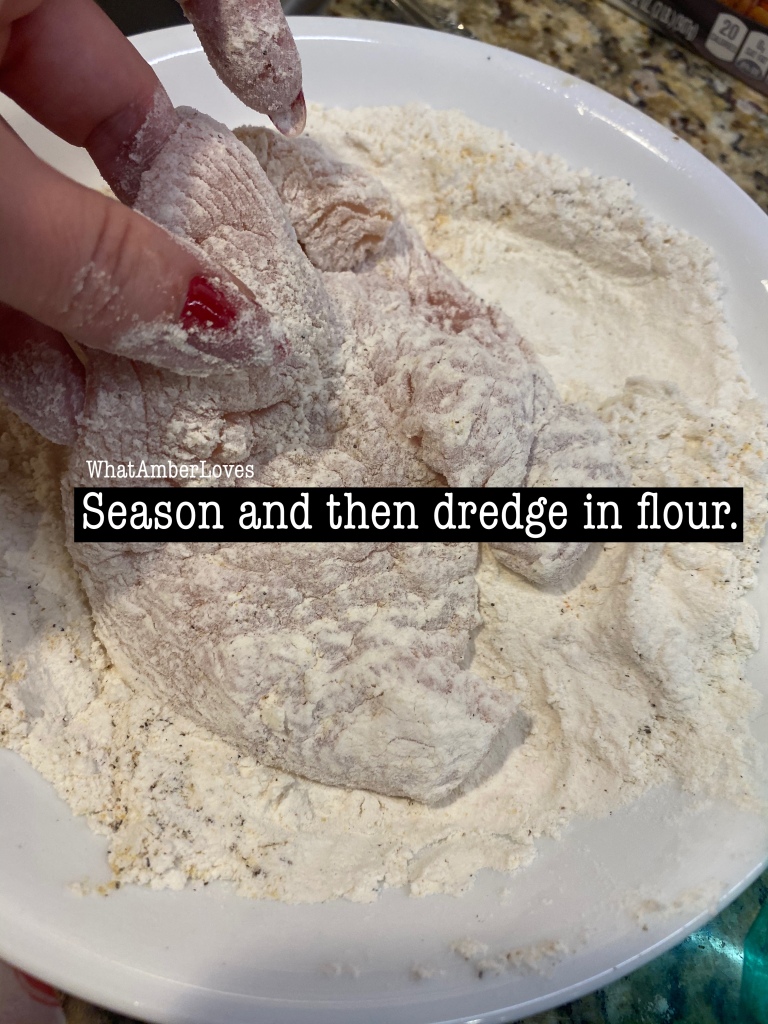
- Split the chicken breasts in half lengthwise. Flatten each piece between 2 sheets of waxed paper or plastic wrap with a meat mallet to about 1/4-inch thickness. Season with salt, pepper, and garlic powder. Dredge each flattened piece in the flour.
- In the same pan you cooked the mushrooms in, add 1 tbs of the butter and heat over medium-high heat.
- Add 2 chicken breast pieces and brown well on all sides. Remove and set aside.
- Repeat the browning process 2 more times (using a tbs of butter with each shift)–you have to do this in shifts so the chicken is not crowded in the pan and browns evenly. Don’t drain the drippings, you need it for the marsala sauce.
- Preheat oven to 450 degrees F.
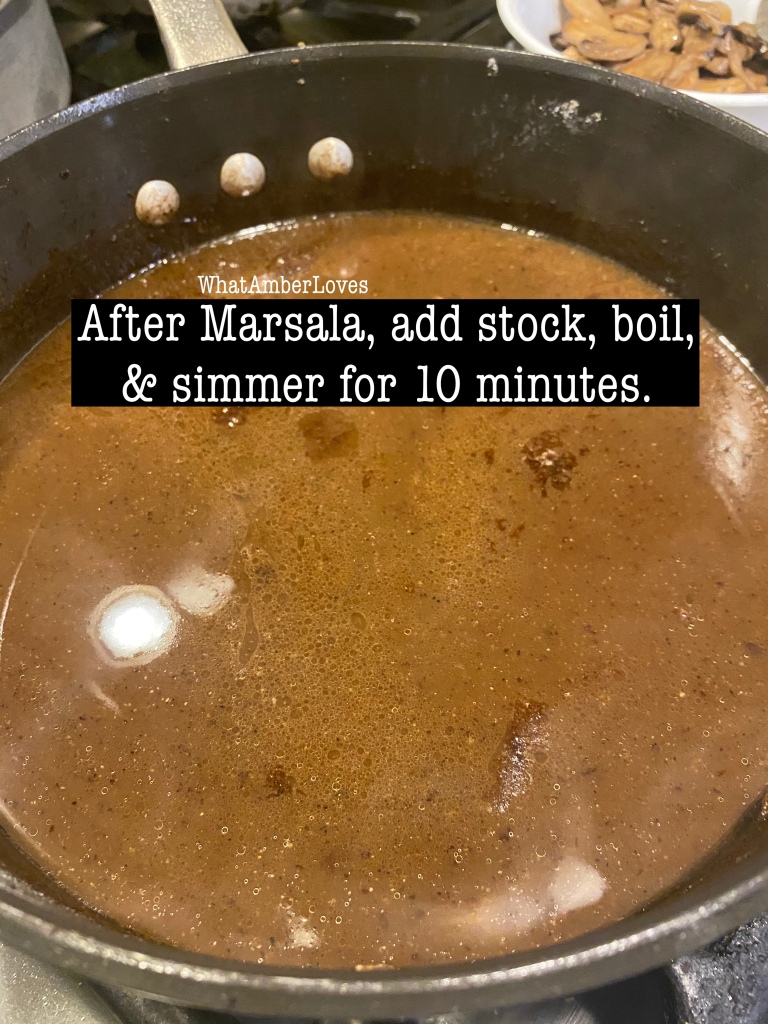
- After all the chicken is browned and set aside, using the same pan with the collected drippings, add the wine a bit at a time scraping the bottom of the pan and stirring as you add, then add the chicken stock, salt and pepper. Bring to a boil, reduce heat and simmer uncovered for 10 minutes.
- Add the chicken breasts back to the skillet being sure each piece is coated/submerged in sauce, or alternatively put chicken into a baking dish and cover with the sauce from the skillet. Sprinkle evenly with the mushrooms.
- Mix the cheeses and green onions and distribute over the top of the chicken.
- Bake for 15-20 minutes until cheese is melted and just starting to brown.
- **(Goes well with pasta or rice, if you want to add bulk; freezes well.)


Love it as much as I do? (I LOVE it. A LOT.)
Do you have a same/similar variation of this recipe and process, too? If so, tell me? 😃
—Amber HH


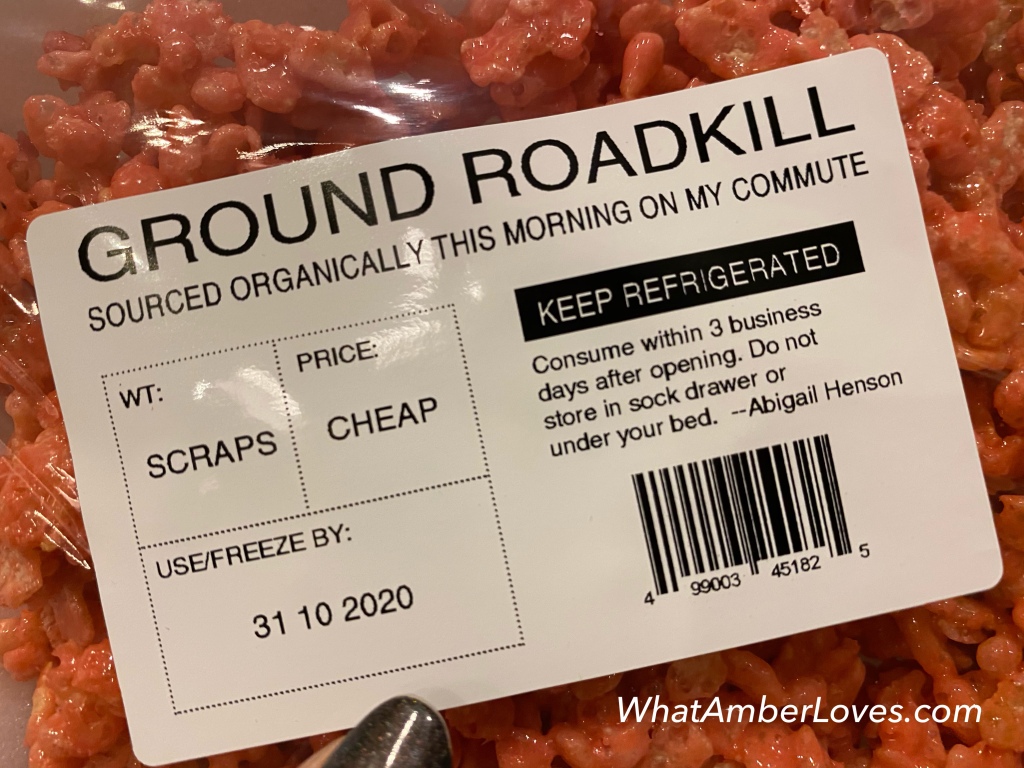
“GROUND ROADKILL” a sweet Halloween treat

Just for fun, every year our family creates at least one consumable, silly Halloween food item. This year, Abigail saw “ROADKILL” on social media somewhere and decided to duplicate/improve upon the idea. So, that’s what she did!

Following a standard recipe for Rice Krispy treats, she added RED food coloring plus a few drops of BLACK food coloring into the melted marshmallow before stirring in the rice cereal. (Adding the black was essential to muddy the pink/red a bit and give the color some depth.)

Packaging. It is really the presentation that transforms these regular treats into something appropriately able to trick friends for Halloween.
Using styrofoam trays, clear cling wrap, and custom printed labels, the treats suddenly transform in appearance from being a sticky sweet indulgence to an appearance of potentially rank (and definitely gross) ROADKILL.
Attention to detail designing the labels was fun! Did you notice the expiration date is on Halloween? The storage instructions? We had fun with this part of the process!
Whether you’re carving jackolanterns, trick-or-treating, going to parties, or just staying home watching scary movies this evening, we hope you enjoy the day!


Happy Halloween, y’all!